Security
Ubuntu server security: SSH, firewall, open ports and secrets management
A practical guide to securing an Ubuntu server: SSH keys, UFW firewall, which ports to keep open, fail2ban, automatic updates and secret rotation policies.
A freshly created cloud server starts receiving automated login attempts within minutes of getting a public IP. You do not need to be an interesting target: bots try SSH passwords, look for open databases and scan for vulnerable versions around the clock. The good news is that a handful of measures, applied in order, remove most of the risk.
This guide is for developers with intermediate server knowledge who deploy applications on Ubuntu Server (22.04, 24.04 or later). It covers SSH access, firewall, which ports to open, updates, users, TLS, secrets and their rotation, with exact commands.
Principles behind everything else
- Minimal surface. What is not installed, listening or open cannot be attacked. Every port and service needs a reason.
- Least privilege. Each person and each process gets only the permissions it needs.
- Defense in depth. No single measure is enough: firewall, strong authentication, updates and monitoring compensate for each other.
- Automate and keep evidence. Anything that depends on remembering gets forgotten. Updates, certificate renewal and intruder blocking should run without intervention.
- Assume something will fail. Prepare backups, logs and a procedure to rotate compromised secrets.
Before you start: almost everything below can lock you out if you get it wrong (SSH and the firewall above all). Keep your provider’s emergency console (VNC, serial or web) at hand, and do not close the active SSH session until you have tested the change from another terminal.
Step 1. Update the system and create your own user
The first thing on a new server is to install pending patches:
sudo apt update && sudo apt upgrade -yWorking as root is dangerous: a mistake or a malicious command has full permissions. Create an administrator user with sudo:
sudo adduser deploy
sudo usermod -aG sudo deploy
Use a name other than admin, ubuntu or root, and one user per person so you know who did what. Shared accounts make auditing and offboarding impossible.
Step 2. SSH access with keys
Passwords get guessed, leaked and reused. SSH keys, properly protected, are much harder to compromise.
Generate the key on your machine (not on the server)
ssh-keygen -t ed25519 -a 100 -C "your-name@laptop"ed25519is the recommended algorithm: short, strong keys.-a 100increases key-derivation rounds to protect the private key.- Set a passphrase when prompted. If someone steals the
~/.ssh/id_ed25519file, they cannot use it directly. Usessh-agentso you do not type it on every connection.
The private key (id_ed25519) never leaves your machine. Only the public one (id_ed25519.pub) is shared.
Install the public key on the server
ssh-copy-id -i ~/.ssh/id_ed25519.pub deploy@SERVER_IP
ssh deploy@SERVER_IP      # should log in without asking for the user's password
Harden the SSH server
Do not edit /etc/ssh/sshd_config directly: create a file in sshd_config.d. The name matters: OpenSSH applies the first value it finds for each option and reads files in alphabetical order. Some cloud images ship 50-cloud-init.conf with PasswordAuthentication yes, so yours must have a lower number.
sudo tee /etc/ssh/sshd_config.d/01-hardening.conf <<'EOF'
PermitRootLogin no
PasswordAuthentication no
KbdInteractiveAuthentication no
PubkeyAuthentication yes
AllowUsers deploy
MaxAuthTries 3
LoginGraceTime 30
X11Forwarding no
ClientAliveInterval 300
ClientAliveCountMax 2
EOF
What each line does:
PermitRootLogin no: nobody logs in directly as root.PasswordAuthentication noandKbdInteractiveAuthentication no: only key authentication is accepted.AllowUsers deploy: allow list of users who may connect over SSH. Add the ones that apply.MaxAuthTries 3andLoginGraceTime 30: limit attempts and the time allowed to authenticate.X11Forwarding no: closes a channel you almost never need.ClientAliveIntervalandClientAliveCountMax: drop idle sessions (about 10 minutes here).
Validate before applying, and check that the effective configuration is what you expect:
sudo sshd -t
sudo sshd -T | grep -E 'passwordauthentication|permitrootlogin|allowusers'
sudo systemctl reload ssh
Then open a second terminal and confirm you can log in. Only then close the original session. If something fails, the open session lets you fix it.
Should you change port 22?
Moving SSH to another port reduces log noise, but it is not a security measure: a scan finds it in seconds. On Ubuntu 22.10 and later, SSH is socket-activated by systemd, so changing Port in sshd_config is not enough and it is easy to lose access. Unless you have a concrete reason, leave it on 22 and protect it with keys, firewall and fail2ban.
More access best practices
-
One key per person and per device, never shared. When someone leaves the team, you delete their line from
~/.ssh/authorized_keysand that is it. -
Review each user’s
authorized_keysperiodically: it should contain only keys you recognise. -
Correct permissions:
chmod 700 ~/.sshandchmod 600 ~/.ssh/authorized_keys. SSH ignores keys when permissions are too open. -
Do not forward your agent (
ForwardAgent) to servers you do not control: whoever is root there can use your key while you are connected. -
With several servers, use a jump host (bastion) with
ProxyJumpand keep internal servers without a public IP:ssh -J deploy@bastion.example.com deploy@10.0.0.12 -
Better still, a VPN (WireGuard, Tailscale) with SSH reachable only from the private network. This removes SSH from the internet entirely.
-
A second factor for sensitive actions: hardware keys (
ed25519-skwith FIDO2) or short-lived SSH certificates on larger teams.
Step 3. Firewall with UFW
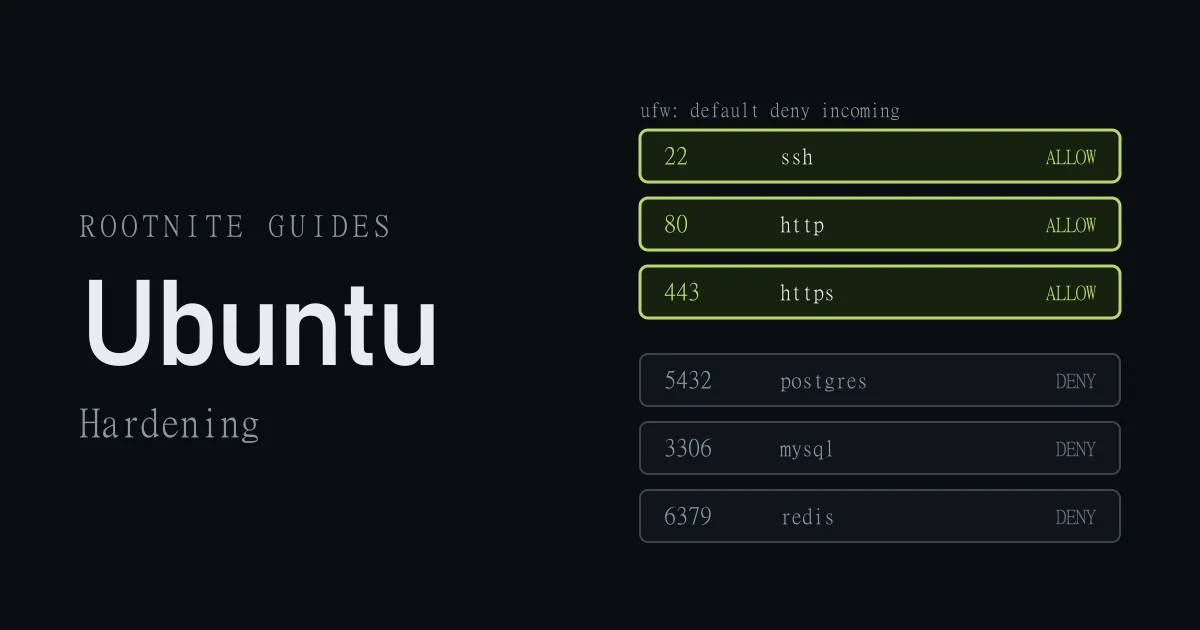
UFW (Uncomplicated Firewall) ships with Ubuntu and is a simple layer over iptables/nftables. The right policy is deny all incoming and allow only what is needed.
Golden rule: allow SSH before enabling the firewall, or you lock yourself out.
sudo ufw default deny incoming
sudo ufw default allow outgoing

sudo ufw limit OpenSSH          # allows SSH and rate-limits repeated attempts from one IP
sudo ufw allow 80/tcp           # HTTP
sudo ufw allow 443/tcp          # HTTPS

sudo ufw enable
sudo ufw status verbose
limit temporarily blocks an IP that opens too many new connections in a short time; it is a basic brake against brute force and complements fail2ban.
Restrict SSH to your IPs
If you have a fixed IP or a VPN, open SSH only for it instead of the whole internet:
sudo ufw delete allow OpenSSH          # if the open rule already exists
sudo ufw allow from 203.0.113.10 to any port 22 proto tcp
Replace 203.0.113.10 with your IP or range (10.8.0.0/24 for a VPN).
IPv6
Check that UFW manages IPv6; if not, the server stays open that way:
grep ^IPV6 /etc/default/ufw # should say IPV6=yesManage rules
sudo ufw status numbered
sudo ufw delete 3               # delete rule number 3
sudo ufw reload
The cloud firewall: a second layer
AWS, Google Cloud, Azure, DigitalOcean and others offer external firewalls (security groups, VPC rules). Use them in addition to UFW: they filter traffic before it reaches the machine and still protect you if someone disables UFW by mistake.
Docker and UFW: a known trap
If you use Docker, ports published with -p or ports: bypass UFW rules, because Docker writes its own iptables rules. A 5432:5432 is open to the internet even if UFW blocks it. Solutions:
- Publish only what is public and bind the rest to localhost:
"127.0.0.1:5432:5432". - Better still, do not publish the database: keep it reachable only by other containers on the same network, as in the Docker and Compose guide.
- Also use the cloud firewall, which applies before Docker.
Step 4. Which ports should be open?
For a server hosting web applications, the short answer is: three.
| Port | Service | Recommended state |
|---|---|---|
| 22/tcp | SSH | Open, restricted to known IPs or a VPN when possible |
| 80/tcp | HTTP | Open; only to redirect to HTTPS and validate certificates |
| 443/tcp | HTTPS | Open; your application’s real traffic |
Everything else should be closed to the outside. In particular, these services must not be exposed to the internet:
| Port | Service | Why |
|---|---|---|
| 3306 | MySQL / MariaDB | Brute force and direct exploitation of the database |
| 5432 | PostgreSQL | Same |
| 6379 | Redis | No authentication by default in many installs |
| 27017 | MongoDB | A history of thousands of exposed and stolen databases |
| 9200 | Elasticsearch | Full data access without authentication in older setups |
| 11211 | Memcached | Abused for amplification attacks |
| 2375 / 2376 | Docker API | API access equals root control of the server |
| 5672 / 15672 | RabbitMQ and its dashboard | Admin panel with well-known default credentials |
| 3000, 8080, 8000 and similar | Development servers and apps | Should sit behind a reverse proxy (Nginx, Caddy) |
The recommended pattern is a reverse proxy on ports 80 and 443 that receives all public traffic and forwards it to your applications, which listen only on 127.0.0.1 or on a private network.
Check what is listening
From the server, list listening ports and the process using each:
sudo ss -tulpnLook at the address column: 127.0.0.1:5432 is reachable only locally, while 0.0.0.0:5432 or *:5432 listens on all interfaces. If something listens on all of them and should not, fix its configuration (bind-address, listen_addresses…) and do not rely on the firewall alone.
From another machine (and only against your own servers), confirm what the outside sees:
nmap -Pn -p- SERVER_IPThe output should show only 22, 80 and 443 open.
Step 5. Block intrusion attempts with fail2ban
fail2ban reads the logs, detects patterns such as repeated failed logins, and blocks the IP in the firewall for a while.
sudo apt install -y fail2banCreate /etc/fail2ban/jail.local (never edit jail.conf, which is overwritten on updates):
[DEFAULT]
bantime  = 1h
findtime = 10m
maxretry = 5
ignoreip = 127.0.0.1/8 ::1 203.0.113.10

[sshd]
enabled = true
backend = systemd
ignoreip keeps you from banning yourself: put your fixed IP or VPN range. Apply and check:
sudo systemctl enable --now fail2ban
sudo systemctl restart fail2ban
sudo fail2ban-client status sshd
With key-only authentication, brute-force attempts no longer succeed, but fail2ban reduces noise and load, and it is also useful to protect other services (Nginx, applications) with extra filters.
Step 6. Automatic security updates
Most real intrusions exploit known vulnerabilities that already have a patch. Enable unattended security updates:
sudo apt install -y unattended-upgrades
sudo dpkg-reconfigure -plow unattended-upgrades
By default it installs security patches only. Some updates (the kernel, for example) need a reboot. Check whether one is pending:
[ -f /var/run/reboot-required ] && cat /var/run/reboot-requiredSchedule a maintenance window to reboot, or enable Unattended-Upgrade::Automatic-Reboot in /etc/apt/apt.conf.d/50unattended-upgrades with a low-traffic time. In production, test changes in a staging environment first and run several instances so you can reboot without downtime.
Also remove what you do not use:
sudo systemctl list-unit-files --state=enabled   # services that start at boot
sudo apt autoremove --purge
Step 7. Users, permissions and services
- Each service with its own unprivileged user (for example
appuser, with no login shell): if it is compromised, the damage stays contained. - Never run applications as root. Containers neither, when the image supports
USER. - Use
sudowith care. Grantsudoonly to those who need it. If you automate deployments, allow only specific commands through a file in/etc/sudoers.d/edited withsudo visudo -f, instead ofNOPASSWD: ALL. - File permissions. Files holding secrets, such as
.env, must be readable only by their owner:chmod 600 .env. Application directories must not be world-writable (chmod 777is almost always a mistake). - Lock inactive accounts:
sudo passwd -l userorsudo usermod -L user, and delete the ones you no longer use.
Step 8. HTTPS with automatically renewed certificates
All public traffic must be encrypted. Let’s Encrypt issues free certificates and certbot renews them on its own. With Nginx:
sudo apt install -y certbot python3-certbot-nginx
sudo certbot --nginx -d example.com -d www.example.com
Verify that automatic renewal works:
sudo certbot renew --dry-run
systemctl list-timers | grep certbot
Certificates last 90 days and renew before they expire; you do not need to schedule anything, but you do need to monitor that renewal does not fail. Once HTTPS works, redirect HTTP to HTTPS and consider enabling the Strict-Transport-Security (HSTS) header.
Step 9. Secrets management and rotation
A secret is any piece of data that grants access: passwords, SSH keys, API tokens, database credentials, signing keys, TLS private keys.
Where to store them and where not
- Never in the repository, not even a private one. Git history keeps everything.
- Never in the Docker image or the source code.
- In development and small servers: environment variables or a
.envfile with600permissions, kept out of version control (.gitignore). - On teams and serious environments: a secret manager (HashiCorp Vault, AWS Secrets Manager, Google Secret Manager, Azure Key Vault) or encrypted files in the repository with SOPS or
age. - Scan your repositories for secrets committed by mistake, with tools such as
gitleaksor your platform’s secret scanning, and enforce it in CI. - A different secret per environment and per service. Development, staging and production do not share credentials.
How often to rotate them
Rotation is not a ritual: its purpose is to limit how long a stolen secret stays useful and to bound forgotten access. It helps to distinguish human passwords from machine secrets.
Human passwords. Current guidance, such as NIST SP 800-63B, advises against mandatory periodic changes: they lead to weaker, more predictable passwords. It is better to use a password manager, long unique passwords and two-factor authentication, and to change a password when there is suspicion or evidence of compromise.
Machine and service secrets. These do benefit from rotation, and the ideal is to automate it:
| Secret | Recommended rotation | Rotate immediately when |
|---|---|---|
| Database and service passwords | Every 90 days (or automatic with a secret manager) | It leaks, a person with access leaves, or there is an incident |
| Third-party tokens and API keys | Every 90 days | They show up in a repository, a log or a chat |
| People’s SSH keys | Yearly review, and on team or device change | A device is lost or stolen, or the person leaves |
| Deployment and CI/CD keys | Every 6 to 12 months | CI platform access is widened, or there is an incident |
| TLS certificates | Automatic (Let’s Encrypt, 60 to 90 days) | The private key is exposed |
| Signing secrets (JWT, sessions) | Every 6 to 12 months, with a dual-validity window | A leak is suspected |
How to rotate without downtime
- Create the new secret without removing the old one.
- Make the system accept both for a short window (for example, two database users, or two signing keys).
- Deploy the application with the new secret and verify it works.
- Revoke the old secret.
- Record the rotation (date, who and why).
If a secret leaks
Treat it as compromised from that moment: rotate first, investigate after. Deleting it from the repository is not enough, because it is already in the history and may have been copied. Review access logs for the exposure period and document the incident.
Step 10. Logs, monitoring and backups
Logs
sudo journalctl -u ssh --since "1 hour ago"     # SSH activity
last -a | head                                  # recent sessions
sudo lastb | head                               # failed attempts
sudo tail -f /var/log/auth.log                  # authentication in real time
Logs that live only on the server disappear if it is compromised. Ship them to an external service (Loki, a SIEM, your provider’s logging service) and set alerts for unusual logins, spikes in failed attempts or service crashes.
Backups
- Apply the 3-2-1 rule: three copies, on two different media, one off the server.
- Encrypt backups and keep the keys elsewhere.
- Test restores regularly. A backup that was never restored is an assumption, not a backup.
- Protect backups from deletion from the server itself (versioned or immutable storage) so ransomware cannot remove them too.
Quick audit
Lynis runs an automatic review and gives concrete recommendations:
sudo apt install -y lynis
sudo lynis audit system
Checklist
- System updated and
unattended-upgradesenabled. - Own user with
sudo; one user per person; no SSH access forroot. - SSH with
ed25519keys with passphrase only; passwords disabled. -
sshd -Tconfirms the effective configuration. - UFW enabled with
deny incoming; only 22 (restricted), 80 and 443 open. - Cloud firewall configured as a second layer.
- Databases and caches listening only on
127.0.0.1or a private network. -
fail2banenabled with your IP inignoreip. - HTTPS with verified automatic renewal (
certbot renew --dry-run). - Services running as unprivileged users.
- Secrets outside the repository, with
chmod 600and a defined rotation. - Logs shipped off the server.
- Encrypted backups with a tested restore.
Common mistakes
- Enabling UFW without allowing SSH first. The session drops and you cannot get back in without the provider console.
- Leaving the database on
0.0.0.0“just to test”. One of the most frequent causes of mass data leaks. - Trusting UFW with Docker. Published ports go straight through it.
- Reusing the same password or key across environments. A compromise in development becomes access to production.
- Committing
.envto Git “just once”. It is already part of the history. - Changing the SSH port as the only defense. It is obscurity, not security.
- Not testing backup restores. You find out they do not work when you need them most.
- Ignoring pending reboots. A patched kernel is not in use until you reboot.
Frequently asked questions
Is disabling SSH passwords enough?
It is the single most important measure, but not the only one. Add the firewall, fail2ban, automatic updates and good secret practices: each covers a different risk.
What if I locked myself out of the server?
Log in through your provider’s emergency console (VNC, serial or web), check sudo ufw status and sudo sshd -t, and fix the rule or configuration. That is why you should always test from a second session before closing the first.
UFW or iptables/nftables directly?
UFW is enough for most application servers and is harder to get wrong. If you need advanced rules (NAT, fine-grained connection limits), nftables gives more control.
How often should I change my passwords?
For people, not on a calendar: use a password manager, long unique passwords and 2FA, and change them on any suspicion. For machine secrets, define a periodic rotation and automate it wherever you can.
Do I need a WAF or DDoS protection?
For a public application, a CDN with a WAF and DDoS mitigation (Cloudflare, or your cloud provider’s) adds a valuable layer in front of the server. It does not replace what is described here: it complements it.
Further reading
- Ubuntu, Ubuntu Server security documentation
- Ubuntu, Firewalls with UFW
- OpenSSH,
sshd_configmanual - NIST, SP 800-63B: Digital Identity Guidelines
- OWASP, Secrets Management Cheat Sheet